Mini Soda Cakes with Big Decorating Impact
Want to create a dessert that has a big impact with friends and family members? Then take a look at these mini soda cakes and their decorations.
This guide reveals the secret behind a incredibly popular two-ingredient hack. It combines simplicity with amazing visual appeal.
You can achieve fantastic results without spending hours in the kitchen.
We will walk you through the entire process. You’ll learn how to select your ingredients and master easy techniques.
These methods will make your creations the centerpiece of any dessert table.
Perfect for a child’s birthday or a casual get-together, this approach offers endless creative possibilities.
The unique moisture from the soda creates a tender, fluffy texture that often surpasses traditional recipes. It’s a fantastic option for those with certain dietary needs.
This method proves that beautiful desserts don’t require professional training. You are about to discover how to make treats that look and taste incredible.
Key Takeaways
- Learn a simple two-ingredient method for creating impressive desserts.
- Discover how to achieve a professional look with minimal baking expertise.
- Understand why this hack produces a moist, fluffy texture.
- Get ideas for various occasions, from parties to casual gatherings.
- Find out how this approach can accommodate some dietary restrictions.
- Master easy decorating techniques to make your creations stand out.
- Gain the confidence to create beautiful treats, regardless of your skill level.
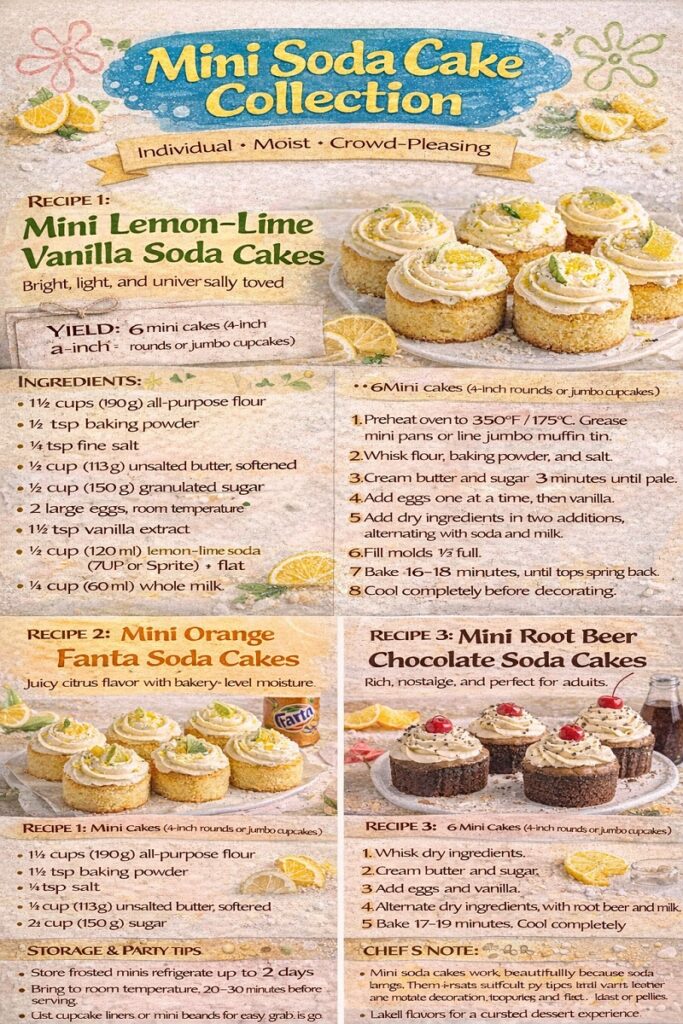
MINI SODA CAKE COLLECTION
Individual • Moist • Crowd-Pleasing
Here are three mini soda cake recipes, each designed for individual servings.
You’ll also find three distinct decoration techniques so they look intentional, elegant, and party-ready. Not like scaled-down leftovers.
Each recipe yields 6 mini cakes (perfect for tastings, dessert bars, or mix-and-match party trays).
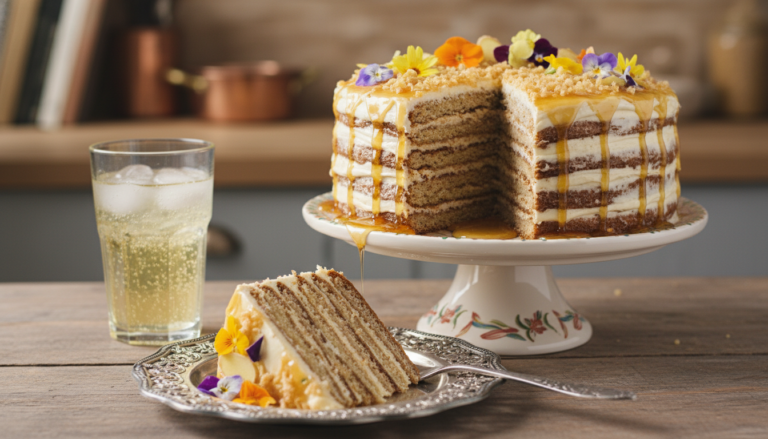
MINI LEMON–LIME VANILLA SODA CAKES
Bright, light, and universally loved
Yield
6 mini cakes (4-inch rounds or jumbo cupcakes)
Ingredients
- 1½ cups (190 g) all-purpose flour
- 1½ tsp baking powder
- ¼ tsp fine salt
- ½ cup (113 g) unsalted butter, softened
- ¾ cup (150 g) granulated sugar
- 2 large eggs, room temperature
- 1½ tsp vanilla extract
- ½ cup (120 ml) lemon-lime soda (7UP or Sprite), flat
- ¼ cup (60 ml) whole milk
Method
- Preheat oven to 350°F / 175°C. Grease mini pans or line jumbo muffin tin.
- Whisk flour, baking powder, and salt.
- Cream butter and sugar 3 minutes until pale.
- Add eggs one at a time, then vanilla.
- Add dry ingredients in two additions, alternating with soda and milk.
- Fill molds ⅔ full.
- Bake 16–18 minutes, until tops spring back.
- Cool completely before decorating.
MINI ORANGE FANTA SODA CAKES
Juicy citrus flavor with bakery-level moisture
Ingredients
- 1½ cups (190 g) all-purpose flour
- 1½ tsp baking powder
- ¼ tsp salt
- ½ cup (113 g) unsalted butter, softened
- ¾ cup (150 g) sugar
- 2 large eggs
- 1 tsp vanilla extract
- ½ cup (120 ml) orange Fanta, flat
- ¼ cup (60 ml) whole milk
Method
Follow the same method as Recipe 1.
Bake 17–19 minutes. Cool fully.
MINI ROOT BEER CHOCOLATE SODA CAKES
Rich, nostalgic, and perfect for adults
Ingredients
- 1¼ cups (155 g) all-purpose flour
- ¼ cup (25 g) cocoa powder
- 1½ tsp baking powder
- ¼ tsp baking soda
- ¼ tsp salt
- ½ cup (113 g) butter, softened
- ¾ cup (150 g) sugar
- 2 large eggs
- 1 tsp vanilla extract
- ½ cup (120 ml) root beer, flat
- ¼ cup (60 ml) whole milk
Method
- Whisk dry ingredients.
- Cream butter and sugar.
- Add eggs and vanilla.
- Alternate dry ingredients with root beer and milk.
- Bake 17–19 minutes.
- Cool completely.
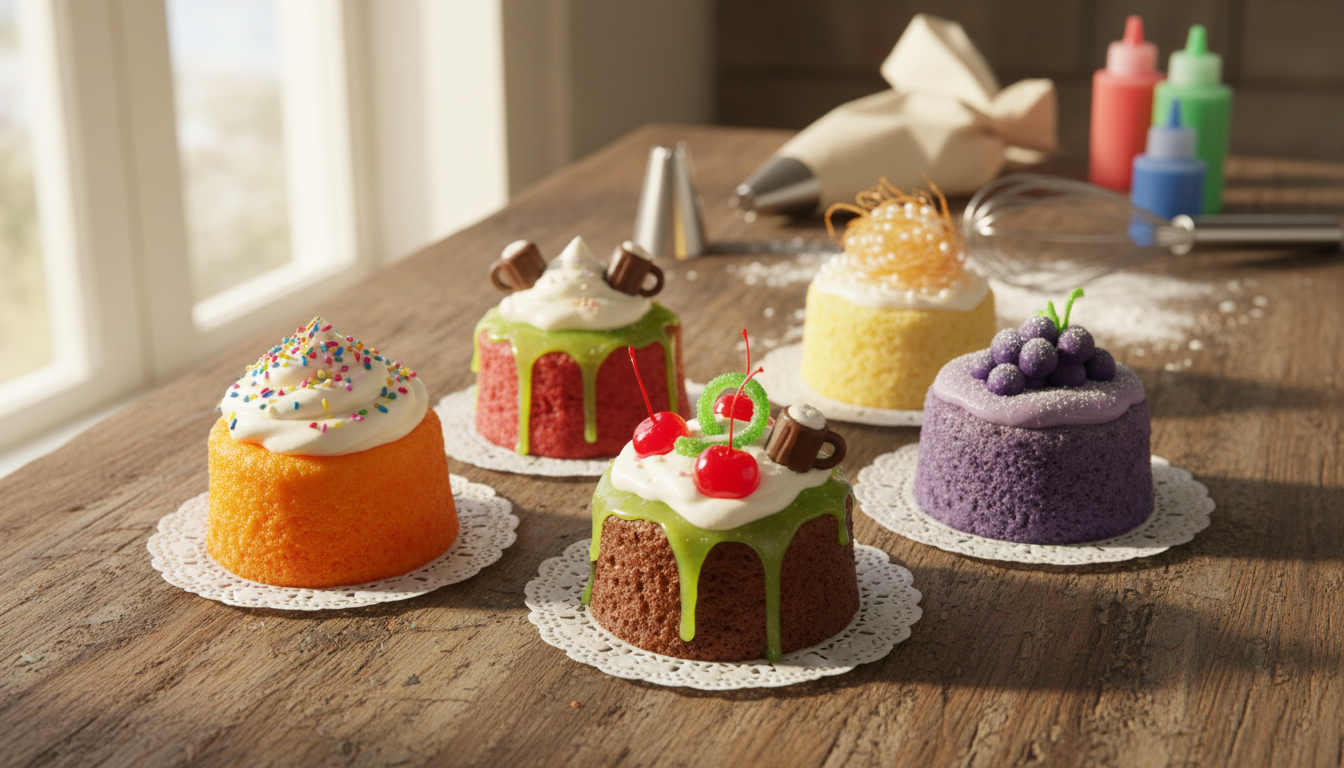
DECORATING STYLES FOR MINI SODA CAKES
MINI ROSETTE CROWNS (ELEGANT & CLASSIC)
Best For
Lemon Love Cove or orange cakes
You’ll Need
- Vanilla or strawberry buttercream
- Piping bag with large star tip (1M or 2D)
Steps
- Pipe rosettes starting at the outer edge, spiraling inward.
- Cover just the top for a clean look.
- Chill 10 minutes to set.
✨ Looks bakery-made and photographs beautifully.
GLAZE + GARNISH (MINIMAL & MODERN)
Best For
Orange Crush Paradise Cake or lemon cakes
Simple Soda Glaze
- 1 cup (120 g) powdered sugar
- 1½–2 tbsp matching soda
Steps
- Whisk glaze until thick but pourable.
- Spoon over mini cakes.
- Finish with:
- Citrus zest
- Edible flowers
- Candied peel
✨ Perfect for upscale dessert tables.
FLOAT-STYLE FINISH (FUN & PLAYFUL)
Best For
You’ll Need
- Vanilla buttercream
- Small offset spatula
- Maraschino cherries
- Chocolate sprinkles
Steps
- Frost tops in soft swirls to mimic melting ice cream.
- Add a cherry on top.
- Sprinkle lightly with chocolate sprinkles.
✨ Instantly recognizable and party-friendly.
STORAGE & PARTY TIPS
- Store frosted minis refrigerated up to 2 days
- Bring to room temperature 20–30 minutes before serving
- Use cupcake liners or mini boards for easy grab-and-go
- Label flavors for a curated dessert experience
CHEF’S NOTE
Mini soda cakes work beautifully because soda keeps them moist without the need of using syrups.
Also, their smaller size makes decoration forgiving and fast, making them ideal for parties.
Introduction to Mini Soda Cakes Decorating
Discover how simple ingredients can transform into extraordinary desserts that delight everyone. This approach revolutionizes home baking by making it accessible to all skill levels.
You’ll find this method incredibly straightforward. The basic formula requires just two main components that work together beautifully.
Why Choose Mini Soda Cakes?
These treats offer remarkable advantages over traditional baking methods. They save you valuable time while delivering impressive results.
The absence of certain ingredients makes them perfect for various dietary needs. You can accommodate friends with specific food restrictions easily.
| Feature | Soda Cake Method | Traditional Recipe | Benefit |
|---|---|---|---|
| Ingredients | 2 main items | 5+ components | Saves time and money |
| Preparation | Single bowl mixing | Multiple steps | Simplifies process |
| Dietary Options | Egg-free, dairy-free | Standard ingredients | More inclusive |
| Texture | Exceptionally moist | Varies by recipe | Consistent quality |
The Simplicity and Fun of Soda Cake Recipes
You’ll appreciate how effortless the preparation becomes. Mix everything by hand in one bowl for quick cleanup.
The carbonation creates a light, airy texture that rivals traditional methods. Experiment with different flavor combinations to find your favorites.
This approach takes the stress out of baking. You can focus on creative presentation rather than complex techniques.

Getting Started with Your Soda Cake Ingredients
Before you begin mixing, let’s ensure you have everything ready for success. Proper preparation makes the entire process smoother and more enjoyable.
Having the right components on hand will help you create delicious treats with confidence. This simple approach requires minimal items but delivers maximum flavor.
Essential Ingredients and Substitutions
You’ll need one standard package of cake mix, typically between 13.5 and 16 ounces. Any brand works well for this method.
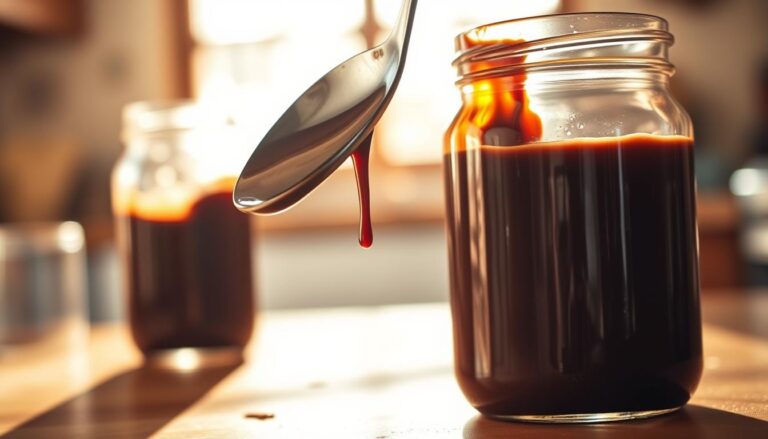
The carbonated beverage is equally important for achieving the perfect texture.
Choose a fresh 12-ounce can or measure 1½ cups from a larger bottle. The bubbles create the light, airy crumb that makes these desserts special.
Flat liquid will result in a dense final product.
For dietary preferences, you can use diet options to reduce sugar content. Club soda or sparkling water also work beautifully.
These alternatives maintain the desired texture while offering flexibility.
Tools and Equipment You Need
Select your baking pan based on your presentation preferences. You can use two 8-inch round pans, a 9×13-inch sheet pan, or a bundt pan.
Each option creates a different look for your creation.
Your mixing bowl should be large enough to handle the foaming action. Essential tools include parchment paper or cooking spray to prevent sticking.
A whisk or large spoon helps combine ingredients smoothly.
Don’t forget a rubber spatula for scraping the bowl clean. A toothpick tests doneness, while a wire rack ensures proper cooling.
If adding frosting, an offset spatula creates a professional finish.

Step-by-Step Guide to Making Mini Soda Cakes
The magic happens when you combine your prepared components using this straightforward method. You’ll be amazed at how quickly everything comes together.
Mixing the Cake Mix and Soda
Begin by preheating your oven to 350°F. This temperature works perfectly for all variations. Combine your dry mix with the carbonated beverage in a large bowl.
You’ll notice immediate fizzing as the ingredients interact. Stir gently until the batter becomes smooth. Avoid overmixing to preserve the carbonation that creates the light texture.
Transfer the mixture to your prepared pan promptly. This ensures you capture all the active bubbles for optimal results.
Baking Tips for a Perfect Crumb
Baking times vary by pan size. Use 30-33 minutes for a 9×13-inch sheet or 8-inch rounds. Smaller pans need 25-28 minutes, while larger ones require 40-43 minutes.
Test doneness with a toothpick inserted in the center. It should come out clean without wet batter clinging to it.
These treats often benefit from slightly longer baking than traditional recipes.
After removing from the oven, let your creation rest in the pan for about 5 minutes. This brief cooling period helps it firm up for easier handling. Then carefully transfer to a wire rack.
Allow complete cooling before adding any toppings. Proper air circulation prevents sogginess and ensures your finish stays perfect.
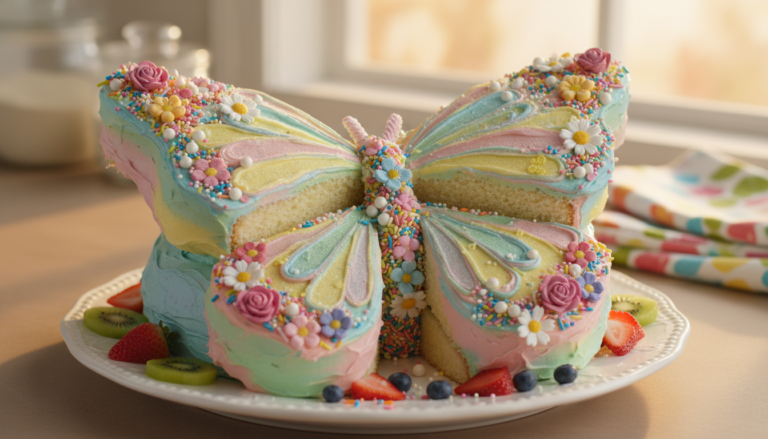
Creative Decorating Techniques for Mini Soda Cakes
Elevate your dessert presentation with these simple and effective decorating strategies. The finishing touches transform your baked goods from ordinary to extraordinary.
Using Frosting and Sprinkles for a Flawless Finish
Your soda cake creation offers wonderful flexibility in topping choices. While the moist texture stands well on its own, frosting adds visual appeal and flavor complexity.
Choose from buttercream, cream cheese frosting, or lighter options like whipped cream. Softer spreads work beautifully but should be applied closer to serving time.
Apply your topping gently to preserve the delicate crumb. Aggressive spreading can mix cake pieces into your frosting.
Related: Elegant Soda Cake Decoration for Weddings and Showers.
| Frosting Type | Best For | Stability | Application Tip |
|---|---|---|---|
| Buttercream | All occasions | High stability | Apply at room temperature |
| Whipped Cream | Immediate serving | Low stability | Chill before applying |
| Cream Cheese | Rich flavors | Medium stability | Use chilled for best results |
| Cool Whip | Quick decorating | Medium stability | Apply just before serving |
Decorative Ideas to Impress Your Guests
Create stunning visual effects with thoughtful garnishes. For chocolate varieties, try dark chocolate curls or cocoa powder dusting.
Fresh berries complement vanilla creations beautifully. Citrus options shine with grated zest and thin fruit slices.
Themed decorations like space-themed cupcake designs add playful charm. Use candy pieces and sprinkles to reinforce your flavor profile.
Flavor Combinations and Customization Ideas
Unlock a world of creative possibilities by exploring different flavor combinations in your baking. The basic recipe serves as a perfect canvas for your imagination.
You can create treats that match any occasion or personal preference. The soda flavor comes through most clearly when using vanilla or yellow cake mixes.
Mixing Cake Flavors with Unique Soda Pairings
Try vanilla cake with root beer for a nostalgic Root Beer Float experience. This combination tastes like the classic ice cream parlor favorite.
Orange soda paired with vanilla creates an Orange Creamsicle treat. Chocolate cake works beautifully with cola for a rich, complex flavor.
Lemon cake mix with lemon-lime soda makes a refreshing Lemonade option. For warm autumn notes, spice cake with ginger ale creates a Ginger Spice variation.
Adapting the Recipe for Cupcakes or Bundt Cakes
This method adapts perfectly to individual servings. Simply distribute your batter among 24 cupcake liners for easy portioning.
Bake for 15-20 minutes until a toothpick comes out clean. Cupcakes hold together better than larger formats due to their size.
Don’t hesitate to experiment with unique combinations. Grape soda with vanilla makes a fun Purple Cow treat.
Regional favorites like Cheerwine with chocolate offer distinctive Southern flair.
Related: Learn to make mini bundt cakes with eggnog soda glaze.
Mini Soda Cakes Decorating: Tips for Success
Even experienced bakers encounter occasional challenges, but these simple solutions will ensure your soda cake turns out perfectly every time.
Understanding how this method differs from traditional recipes helps you achieve the best results.
Overcoming Common Baking Challenges
Your creation might appear flatter than traditional versions. This happens because the recipe lacks eggs and other stabilizers.
Don’t worry, the taste and texture remain exceptional despite the lower profile.
Bake your treat toward the upper end of the recommended time range. Those extra minutes help the structure set firmly. This reduces crumbling when you slice your dessert.
Always line your pan bottom with parchment paper cut to fit precisely. This prevents sticking and protects your creation during removal.
You must use either parchment or non-stick spray. Skipping this step risks ruining your presentation.
Remove the parchment while your dessert is still warm. Waiting too long makes removal difficult. The paper might tear away pieces if it cools completely.
Leave the sides of your pan ungreased. This allows the batter to cling to the sides as it rises. You’ll get more even rising and better structure.
If your treat didn’t rise properly, you might have overmixed the batter after adding the soda. Old cake mix where leavening agents lost effectiveness can also cause this issue.
A sunken middle usually means it needs more baking time. Test doneness with inexpensive square toothpicks rather than smooth round ones. They give more accurate results.
For extra structure, you can add melted butter and eggs to your batter. This helps your creation stick together better.
Remember this modification changes it from a true two-ingredient recipe.
From simple Mix to Stunning Dessert
The journey from simple mix to stunning dessert is now complete, giving you the confidence to impress at any event.
You’ve mastered a remarkable recipe that transforms basic ingredients into extraordinary treats.
This innovative way of baking saves valuable time while delivering professional results.
The method works beautifully for various occasions, from casual gatherings to special celebrations.
Your creative ideas can shine through different flavor combinations and presentation styles.
Remember that each attempt builds your skills so don’t worry about perfection on your first try.
Grab your favorite box cake mix and carbonated beverage to start creating.
The simple process yields delicious results that will become your go-to dessert solution.
A loved one’s birthday coming up? Then check out these simple soda cake decorating ideas,