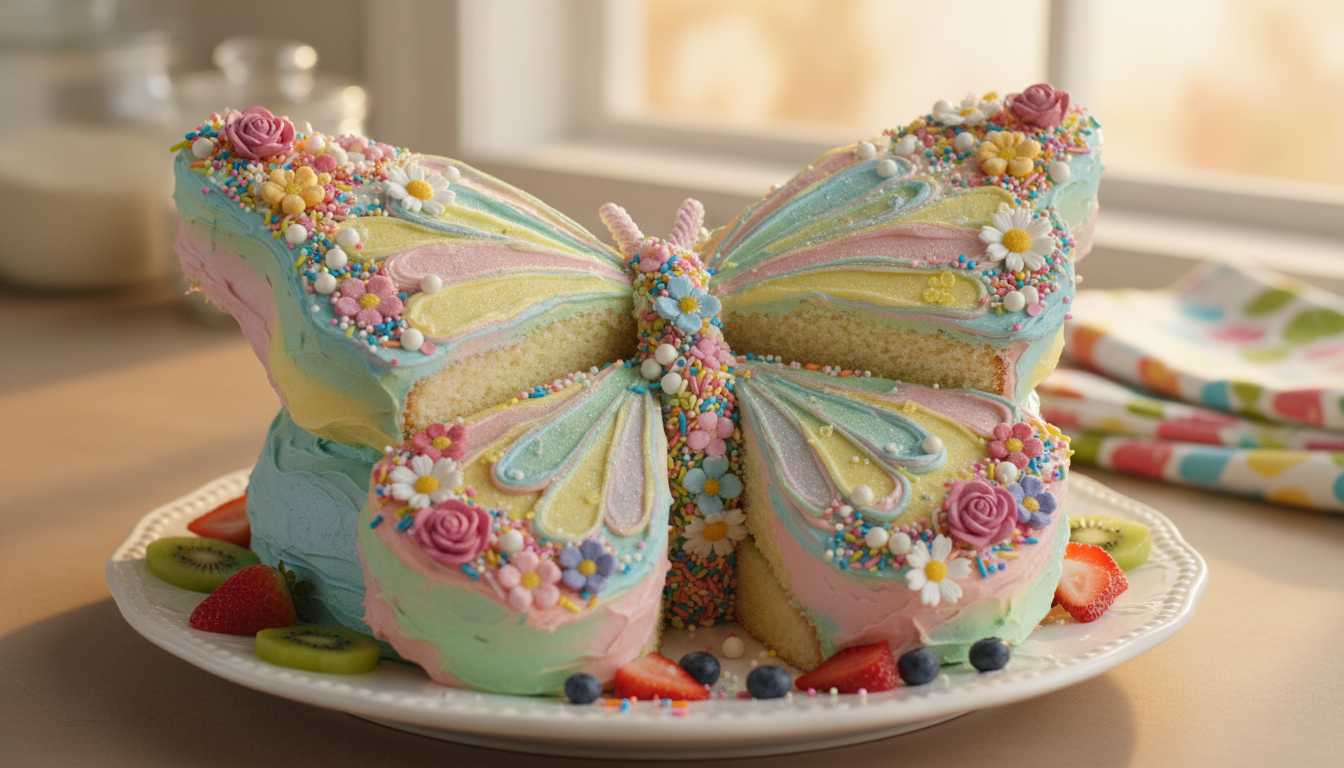
How to Make a “Butterfly” Shape from 7UP Cake
Want to transform a traditional cake into something that will get people talking? Then learn to make a butterfly shape from a simple 7Up Cake.
In the next few minutes you’ll learn how to transform a humble round 7UP cake into an impressive masterpiece.
It’s the perfect project for a spring birthday party or a summer celebration. You don’t need any special pans or advanced skills.
The entire process is broken down into easy steps. You’ll start with a moist and delicious base that holds its shape beautifully.
Then, with a few strategic cuts, you’ll create symmetrical wings.
The final decorating stage is where your personality shines through with fondant, sprinkles, and edible markers.
Even if you’re new to this kind of project, our friendly instructions will build your confidence.
You’ll be amazed at what you can accomplish in about 12 hours total time, with most of that dedicated to the fun part: decorating.
Key Takeaways
- Create a beautiful butterfly-shaped dessert using a simple round cake as your base.
- This project is ideal for beginners and requires no special baking pans or tools.
- The 7UP cake recipe provides a moist, sturdy structure perfect for cutting and shaping.
- Learn the simple cutting technique to form perfectly symmetrical wings for your design.
- Perfect for birthday parties and spring celebrations, allowing for endless color and theme variations.
- The total project time is approximately 12 hours, with most time allocated to decorating.
Turning a Classic 7UP Round Cake into a Butterfly
Here’s the method to make a classic 7UP Round Cake and then cleanly transform it into a butterfly shape suitable for birthdays, showers, or elegant celebrations.
Yield: One 9-inch round cake (butterfly serves 12–14)
Texture: Ultra-moist, fine crumb
Flavor: Light lemon-lime with buttery vanilla notes
1: MAKE THE 7UP ROUND CAKE
Ingredients
- 315 g (2½ cups) all-purpose flour
- 300 g (1½ cups) granulated sugar
- 1½ tsp baking powder
- ½ tsp baking soda
- ½ tsp fine salt
- 170 g (¾ cup) unsalted butter, softened
- 3 large eggs, room temperature
- 240 ml (1 cup) 7UP, room temperature and flat
- 120 ml (½ cup) whole milk, room temperature
- 1½ tsp vanilla extract
- Zest of 1 lemon (optional, recommended)
Method
- Prepare pan & oven
- Heat oven to 175°C / 350°F
- Grease and line one 9-inch round cake pan
- Mix dry ingredients
- Whisk flour, sugar, baking powder, baking soda, and salt
- Incorporate butter
- Beat butter into dry ingredients until mixture resembles damp sand
- Add eggs
- Add eggs one at a time, mixing until fully incorporated
- Add liquids
- Whisk 7UP, milk, vanilla, and lemon zest
- Add to batter in two additions, mixing until smooth
- Bake
- Pour batter into pan and smooth top
- Bake 35–40 minutes
- Cake is done when a toothpick comes out clean and top springs back
- Cool completely
- Cool in pan 15 minutes, then turn out onto rack
- Chill cake 30 minutes before carving (cleaner cuts)
2: MAKING THE BUTTERCREAM (FOR ASSEMBLY & DECORATION)
Ingredients
- 225 g (1 cup) unsalted butter, softened
- 420 g (3½ cups) powdered sugar, sifted
- 2 tbsp milk or 7UP
- 1½ tsp vanilla extract
- Pinch salt
- Gel food coloring (optional)
Method
- Beat butter until creamy
- Add powdered sugar gradually
- Beat in liquid, vanilla, and salt until smooth and spreadable
3: TRANSFORMING THE ROUND CAKE INTO A BUTTERFLY
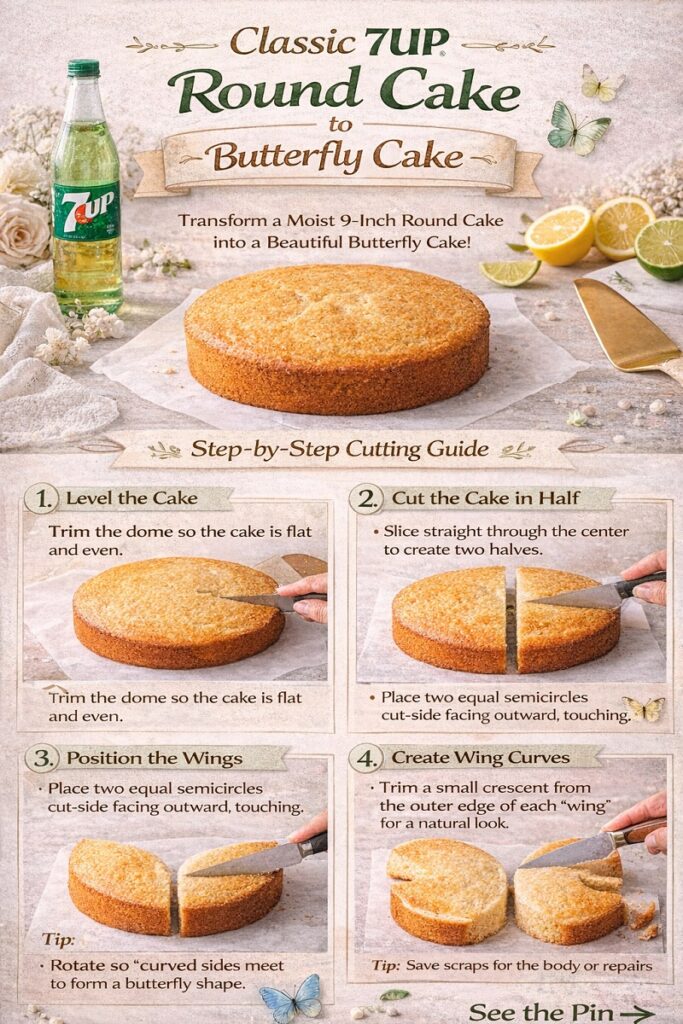
Step-by-Step Cutting Guide
- Level the cake
- Trim the dome so the cake is flat and stable
- Cut the cake in half
- Slice straight through the center to create two equal semicircles
- Position the wings
- Place the two semicircles cut-side facing outward, curved edges touching
- This forms the butterfly wing shape
- Create wing curves (optional but recommended)
- Trim a small crescent from the outer edge of each wing for a more natural look
- Save scraps for body or repairs
Creating the Butterfly Body
Option A: Buttercream Body (Simplest)
- Pipe a thick vertical line of buttercream between the wings
- Texture with ridges using a small spatula or piping tip
Option B: Cake Body (More Defined)
- Stack cake scraps with buttercream
- Shape into an oval
- Place between wings and crumb-coat
4: CRUMB COAT & FINAL FROSTING
- Apply a thin crumb coat to entire butterfly
- Chill 20–30 minutes
- Apply final frosting layer smoothly
5: DECORATING THE BUTTERFLY
Elegant Decoration Ideas
- Pipe wing details using petal or leaf tips
- Add pearl dragées along wing edges
- Use two-tone buttercream for wing gradients
- Finish with edible shimmer or soft luster dust
Antennae (Optional)
- Use thin licorice, piped chocolate, or fondant ropes
Storage & Serving
- Store refrigerated up to 48 hours
- Bring to room temperature 45–60 minutes before serving
- Best texture within 24 hours
Chef’s Notes
- Flat 7UP ensures consistent rise and crumb
- Chilling before carving prevents tearing
- This method scales easily for cupcake pull-apart butterflies
Introduction to the Butterfly Cake Concept
With just a few strategic cuts, a simple round base can become an elegant winged creation. This approach brings whimsy and natural beauty to your dessert table.
It’s perfect for spring celebrations and summer birthday parties.
Understanding the Unique Charm of a Butterfly Cake
The symmetrical wings create a stunning visual presentation that delights guests of all ages. This design captures the essence of transformation and elegance.
Your finished creation will be truly Instagram-worthy.
This concept works beautifully for various occasions. It’s ideal for children’s parties, baby showers, and garden gatherings. The design brings a touch of nature to any celebration.
When and Why to Choose a 7UP Cake Base
Selecting the right foundation is crucial for success.
The 7UP recipe provides exceptional moisture retention and a tender crumb. Its subtle citrus flavor complements various frostings beautifully.
This reliable recipe holds its shape during cutting and decorating. The baking time is approximately 45 minutes.
Planning ahead by preparing your base the day before gives you ample decorating time.
For alternative options, consider a Velvet Vanilla Pound Cake for classic taste. Chocolate variations offer richer, deeper flavors.
Each choice provides a sturdy structure for your artistic creation.

Gathering Your Supplies, Ingredients, and Tools
Before you begin this creative baking project, having the right equipment and materials organized will set you up for success.
Proper preparation ensures smooth workflow and beautiful results.
Essential Baking Supplies and Kitchen Tools
Start with two round cake pans in either 6-inch or 9-inch sizes. A sharp serrated knife is crucial for precise cutting. You’ll also need piping bags with various tips for decorative work.
Don’t forget a long spatula for smoothing frosting. An exacto knife and scissors help create accurate templates from parchment paper. These tools make shaping easier.
Key Ingredients and Their Roles in the Recipe
Quality ingredients form the foundation of your dessert. Whether using a cake mix or homemade recipe, focus on fresh eggs and pure vanilla extract.
These provide structure and flavor.
For chocolate variations, cocoa powder adds rich taste. Gel food coloring creates vibrant hues without thinning your frosting. White fondant serves as your canvas for colorful designs.
| Ingredient | Primary Function | Alternative Options |
|---|---|---|
| Cake Mix Base | Provides structure and volume | Homemade recipes with flour |
| Eggs | Adds moisture and binding | Applesauce for egg-free versions |
| Vanilla Extract | Enhances flavor profile | Almond or lemon extract |
| Gel Food Coloring | Creates vibrant colors | Natural fruit-based colors |
| Fondant | Allows detailed decorating | Buttercream for simpler designs |
Consider Mona Lisa brand fondant for its pliability. It resists cracking during shaping. Your decorative elements like sprinkles and candy eyeballs add personality.
Making butterfly from 7Up Cake: A Step-by-Step Guide
This systematic approach ensures your decorative dessert comes together with precision. Each step builds on the previous one for perfect results.
Baking the Round Cake and Preparing the Layers
Begin by baking two round layers according to your recipe. Allow about 28-45 minutes for proper cooking. Cool them completely before handling.
Proper cooling prevents crumbling. This first step sets the foundation for your entire project. Patience here pays off later.
Cutting, Torting, and Assembling the Cake Halves
Slice each round cake horizontally to create thinner layers. Then cut each one vertically into halves. You’ll have four equal pieces total.
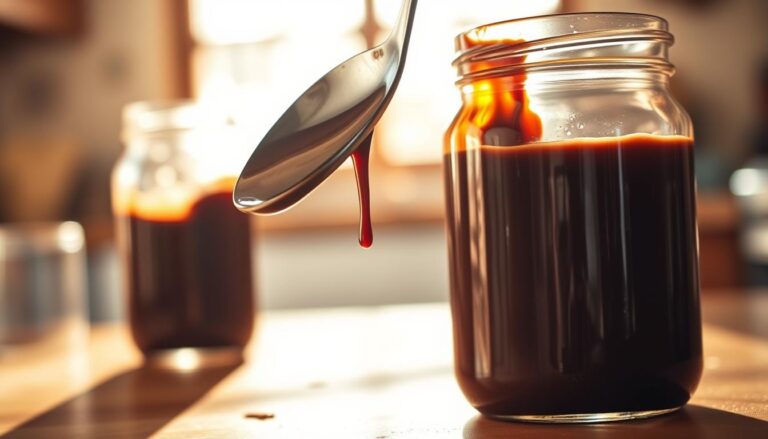
Brush simple sugar syrup onto each layer. This keeps everything moist during assembly. Stack two halves together for each wing section.
Building the Wings and Body with Precision
Use a template to shape the wing edges. Round the outer corners and trim where they meet the center. Position your wings on the serving board.
Apply frosting between layers and add a crumb coat. Chill for about 60 minutes until firm. Place the body element precisely between the wings.
Final frosting creates smooth surfaces on top and sides. Another chilling period prepares your creation for decoration. Your structure is now ready for artistic touches.

Customizing and Decorating Your Butterfly Cake
This is where your creative vision truly takes flight. After assembling your structure, the decorating stage lets you add personality and vibrant life to your dessert.
You have several artistic paths to choose from. Each method offers a unique way to make your creation special for any celebration.
Creative Fondant and Icing Techniques
Fondant provides a smooth canvas for intricate designs. Roll out your chosen colors and drape them over the chilled wings.
Trim the edges with a sharp knife for a clean finish. You can cut smaller shapes to layer on top, creating beautiful patterns.
Use a black edible marker to add delicate vein details. This simple step gives your wings a realistic and elegant look.
Using Stencils, Piping, and Colorful Toppings
Stencils offer a quick way to achieve professional patterns. Place the stencil on the cake and pipe buttercream through it.
Lift the stencil carefully to reveal a perfect design. For piping, outline sections and fill them with different colors and tips.
Star tips create texture, while round tips are great for dots. Add the body with a round tip using dark frosting for contrast.
Final touches like sprinkle balls and white spots complete the look. These details make your dessert visually stunning.
| Decorating Method | Best For | Key Tool | Skill Level |
|---|---|---|---|
| Fondant Draping | Smooth, polished finish | Rolling Pin | Intermediate |
| Buttercream Stenciling | Intricate, repeatable patterns | Plastic Stencil | Beginner |
| Piping Designs | Textured, dimensional effects | Piping Bag & Tips | All Levels |
| Sprinkle Accents | Quick, colorful details | Tweezers | Beginner |
Your decorating time is flexible. Follow the instructions, but feel free to experiment with colors that match your party theme. This creative process is the most rewarding part.
Skills to make an Impressive Centerpiece
This baking adventure has equipped you with skills for countless future projects as you’ve transformed basic ingredients into an impressive centerpiece that delights guests.
Your beautiful creation showcases both technical skill and artistic vision. The design adapts beautifully to any celebration theme or dietary preference.
Remember to store your finished dessert in a sealed container in the refrigerator for up to three days. Bring it to room temperature before serving for optimal flavor and texture.
The techniques you’ve mastered, from precise cutting to creative decorating, build confidence for more complex projects.
Most importantly, you’ve created something special that reflects your personal touch and care.
Congratulations, keep at it!