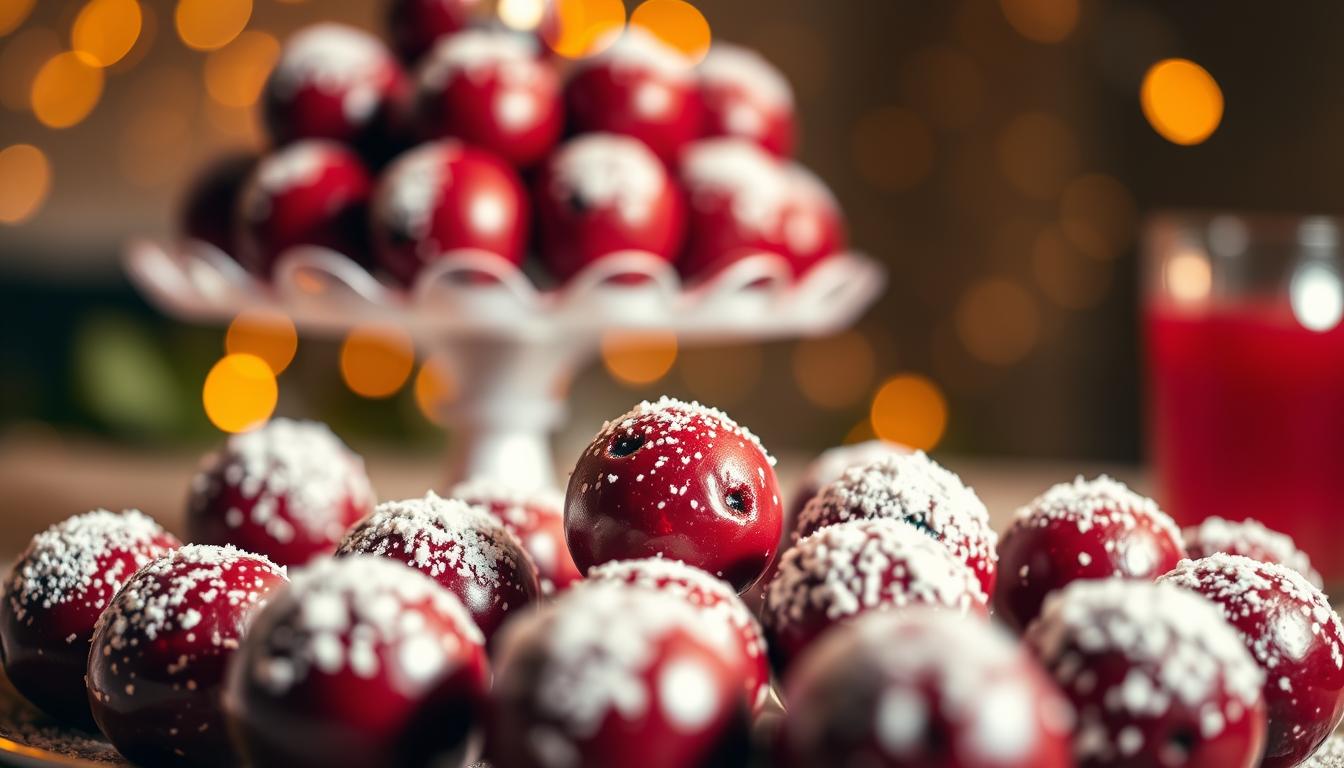
Dr. Pepper Cake Ball “Drops” (Perfect for a NYE Party)
Want to serve a dessert that celebrates the arrival of a new year in style? Then you’ve come to the right place. Check out my Dr. Pepper Cake Ball “Drops”.
Imagine bite-sized treats that pack the nostalgic, unique flavor of a beloved soda into every rich, chocolatey mouthful.
These delightful morsels are the ultimate party dessert, combining simplicity with incredible taste.
Forget the fuss of traditional cake pops with their sticks and tricky decorating. This easier alternative lets you focus on flavor.
You create portable, party-friendly drops that guests can simply grab and enjoy.
The process transforms a classic chocolate cake recipe into something truly special. The result is a perfectly balanced treat that is moist, rich, and absolutely addictive.
Best of all, you can make them ahead of time, so you’re free to enjoy your own party.
So, want to see how it’s done?
Let’s go.
Key Takeaways
- Create a unique dessert that combines a popular soda flavor with chocolate.
- Enjoy a simpler, stick-free alternative to traditional cake pops.
- Impress guests with a treat that sparks conversation and nostalgia.
- Save time by preparing these bites ahead of your celebration.
- Achieve a perfectly balanced flavor that is not overly sweet.
- Master a straightforward recipe for impressive results.
🎉 Recipe for Making Dr. Pepper Cake Ball Drops
Here is the recipe for making Dr. Pepper Cake Ball Drops.
These is a soft Chocolate-Dr. Pepper cake topped with a creamy Dr. Pepper frosting, rolled into decadent bite-sized treats perfect for New Year’s Eve.
Yield: ~40–45 cake balls
Difficulty: Easy
Prep Time: 25 minutes
Bake Time: 30 minutes
Chill Time: 1 hour
INGREDIENTS
For the Cake
- 2 cups (250 g) all-purpose flour
- 1 ½ cups (300 g) granulated sugar
- ¼ cup (25 g) unsweetened cocoa powder
- 1 tsp baking soda
- ½ tsp salt
- 2 large eggs, room temperature
- ½ cup (120 ml) buttermilk
- ½ cup (113 g) unsalted butter, melted
- ¼ cup (60 ml) vegetable oil
- 1 cup (240 ml) Dr. Pepper (not diet)
For the Dr. Pepper Frosting (Binding Mixture)
- 4 oz (115 g) cream cheese, softened
- ½ cup (113 g) unsalted butter, softened
- 1 ½ cups (180 g) powdered sugar
- 2 tbsp (30 ml) Dr. Pepper, reduced*
* Reduction: simmer ½ cup (120 ml) Dr. Pepper until it reaches 2 tbsp (30 ml) for stronger flavor.
Optional Coatings
- Melted dark, milk, or white chocolate
- Sprinkles (gold, silver, NYE-themed)
- Crushed pretzels
- Cocoa powder or powdered sugar
🧁 INSTRUCTIONS
Make the Cake
- Preheat oven to 350°F (175°C). Grease a 9×13-inch (23×33 cm) baking pan.
- In a large bowl, whisk together:
- flour
- sugar
- cocoa powder
- baking soda
- salt
- In a separate bowl, whisk the eggs, buttermilk, melted butter, and oil.
- Pour the wet mixture into the dry ingredients and mix until smooth (avoid overmixing).
- Warm the Dr. Pepper in a small saucepan until just steaming (do NOT boil).
- Stir the warm Dr. Pepper into the batter — it will foam lightly.
- Spread batter into the pan and bake 28–32 minutes, or until a toothpick inserted into the center comes out clean.
- Cool completely (minimum 30 minutes).
Make the Frosting / Binding Mixture
- Beat the cream cheese and softened butter until fluffy.
- Add powdered sugar and beat until smooth.
- Add the Dr. Pepper reduction and continue mixing until fully incorporated.
- Chill 10 minutes to slightly firm up.
Form the Cake Balls
- Crumble the cooled cake into a large bowl until fine.
- Add ½ cup of the frosting mixture and combine with your hands or spatula.
- Add more frosting 1 tablespoon at a time until the mixture holds together like cookie dough — moist but not sticky.
- You will likely use ¾ to all of the frosting depending on cake moisture.
- Roll into 1-inch (2.5 cm) balls.
- Place on a parchment-lined tray and chill at least 1 hour (or freeze 20 minutes).
Coat (Optional but Recommended!)
- Melt your preferred chocolate.
- Dip or drizzle over the chilled cake balls.
- Add sprinkles or crushed toppings immediately (before chocolate sets).
- Refrigerate until firm, about 15 minutes.
Tips for Perfect Cake Ball Drops
- Warming the Dr. Pepper enhances carbonation release and mixes more smoothly.
- Reducing Dr. Pepper for the frosting intensifies the flavor and prevents a watery consistency.
- If dipping in chocolate, use high-quality melting wafers for a smooth, hard shell.
- These keep 5 days refrigerated or 2 months frozen.

Introduction & Ingredients Overview
The secret to these irresistible bites lies in a carefully selected list of pantry staples and one star player.
Understanding your components makes the process smooth and the results spectacular.
Why You’ll Love This NYE Dessert
You will adore this dessert for its incredible simplicity and big flavor impact. It brings a unique soda taste together with rich chocolate in a no-fuss, grab-and-go format.
This method is very forgiving for new bakers. You mix everything instead of creating perfect layers. The final product is moist, balanced, and perfectly sweet.
The subtle spice notes from the soda make these treats stand out. They spark conversation and nostalgia at any party.
Related: Learn to make Coca-Cola Float Shots.
Essential Ingredients Spotlight
Your list of ingredients is straightforward. For the base, you need flour, sugar, cocoa powder, eggs, buttermilk, butter, oil, and the signature soda.
The frosting mixture binds everything. It uses cream cheese, powdered sugar, more butter, and a bit more of Dr. Pepper for maximum flavor.
Quality matters for the best outcome. Use real butter and fresh soda. Good cocoa powder ensures a deep chocolate taste.
Each component has a specific role in this fantastic recipe.
How to Create Dr. Pepper Cake Ball Drops
Transforming your rested chocolate cake into delectable drops is a simple, hands-on process that yields impressive results.
This stage is all about creating the perfect consistency for shaping.
You will combine the cake base with a creamy frosting to form a pliable mixture. The right technique ensures your treats hold their shape beautifully.
Mixing Cake and Frosting Techniques
Start by cutting your cooled cake into pieces. Place them in a large bowl and use your hands to crumble it.
Knead until you have a thick, moist texture with no large chunks.
For the frosting, beat softened cream cheese, powdered sugar, butter, and a bit of the signature soda in a separate bowl.
Make sure the cream cheese is at room temperature for a smooth blend.
Add this creamy frosting to the crumbled cake in the bowl. Knead everything together by hand until the mixture is moist and holds together well. It should not feel sticky.
If you’re short on time, a 16-ounce can of cream chocolate frosting works as a great alternative. It saves a bit of prep while still delivering fantastic flavor.
| Frosting Option | Prep Time | Flavor Control | Best For |
|---|---|---|---|
| Homemade (Cream Cheese) | Longer | High (Adjustable sweetness) | From-scratch enthusiasts |
| Store-Bought (Canned) | Shorter | Standard | Quick and easy preparation |
Forming the Perfect Drops
Once your cake and frosting are fully combined, cover the bowl and refrigerate the mixture for about two hours.
Chilling firms it up, making shaping much easier.
After chilling, take small portions of the mixture. Roll them quickly between your palms into quarter-size balls.
Working fast prevents the warmth of your hands from softening the dough too much.
Aim for uniform size with each drop. This ensures even coating later and gives your final presentation a professional, polished look that will impress your party guests.
Related: Learn to make Root Beer Truffles.

Decorating and Finishing Touches
The final stage transforms your prepared mixture into dazzling party treats. This is where your simple balls become elegant, professional-looking desserts.
A perfect coating and a festive sprinkle make all the difference for your New Year’s Eve table.
Chocolate Coating and Topping Tips
Choose your coating based on the flavor profile you prefer. White chocolate offers a sweet, creamy contrast to the rich base.
Traditional chocolate bark provides a deeper cocoa flavor. Melt your choice gently using a double boiler or a microwave on a low setting.
Stir frequently for a smooth, glossy consistency. This prevents burning and ensures an even dip.
When dipping, use a professional technique for a clean finish. Submerge each treat completely in the melted chocolate.
As you lift it out, gently twist your wrist. This action encourages excess coating to drip off smoothly.
If too much chocolate clings to the drop, lightly tap your wrist. This creates a thin, even layer that won’t overpower the delicious cake inside.
| Coating Type | Flavor Profile | Melting Difficulty | Best Pairing |
|---|---|---|---|
| White Chocolate | Sweet, Creamy | Medium (Can scorch easily) | Colored sanding sugar |
| Chocolate Bark | Rich, Cocoa-Forward | Easy (More forgiving) | Sprinkles or cocoa powder |
| Dark Chocolate | Bold, Less Sweet | Medium | Sea salt flakes |
Act quickly while the coating is still wet. This is the perfect moment to add your festive toppings.
Sprinkle sanding sugar for a celebratory shimmer. Let the treats cool for just a few seconds before placing them upright.
Use a wax paper-lined surface or a styrofoam block. This prevents smudging and maintains a beautiful finish.
Let your creations harden completely at room temperature. If preparing hours ahead, you can chill them to keep the frosting fresh and the coating firm.
Expert Tips & Variations
With some creative adjustments, you can tailor these treats to suit any dietary preference or party theme.
These expert suggestions help you avoid common baking pitfalls while customizing your dessert.
Alternative Flavor Ideas
Experiment with different soda flavors for unique twists on this recipe. Try cherry cola for a fruity variation or root beer for nostalgic float-inspired taste.
You can also simplify your preparation using a boxed chocolate cake mix. Just substitute the liquid called for with your favorite soda.
This saves time while maintaining great flavor.
Consider different coatings like dark chocolate or colored candy melts. These match your party colors and offer creative possibilities beyond standard options.
Related: Learn to make Coca-Cola Cake.
Storage and Serving Suggestions
Proper storage keeps your desserts fresh for several days. Use an airtight container in the refrigerator, separating layers with plastic wrap.
For longer storage, freeze the uncoated balls for up to two weeks. Thaw them overnight before adding chocolate coating on party day.
When serving, let treats sit at room temperature for 15-20 minutes. This enhances flavor and creates perfect texture. Each serving contains 254 calories with 9g fat.
Plan your baking schedule across two days for best results. The recipe yields 24-36 portions depending on size.
An Iconic Treat that’s easy to Make
You now have all the knowledge to create amazing treats for your celebration.
This guide walked you through each step, from mixing your batter to the final decorative touches.
Your impressive results come from simple techniques. Quality ingredients and careful timing make the difference.
The unique flavor combination is a guaranteed hit. Your guests will love the sophisticated taste.
So gather your ingredients and get ready to bake. These bites offer make-ahead convenience, giving you more time to enjoy your party.
Here’s to a delicious and memorable start to the new year with your fantastic dessert creation!
Want another delightful sweet treat for the holidays?
No problem, take a look at our Churro Bites and Dr. Pepper Chocolate Dipping sauce.