Galaxy Design Cake for a Birthday
Do you have a little space fan at home? Then check out our Galaxy Design cake with Grape soda frosting. It a birthday treat they won’t soon forget.
Imagine presenting a birthday treat that looks like a swirling piece of the universe. Well, you are in luck as this guide will show you exactly how to make that dream a reality.
Creating a stunning space-themed dessert is easier than you might think. Our friendly recipe breaks down the process into simple, manageable steps.
You’ll learn to create nebulas, twinkling stars, and deep space colors. Oh!, and the unique grape soda frosting adds a fantastic flavor and the perfect purple hue.
You will master techniques from simple buttercream swirls to advanced glazing methods.
This project is perfect for both new and experienced bakers.
By the end, you’ll have the confidence to create a stellar masterpiece.
Ready to begin this space adventure?
Well, put on your helmet and let’s go!
Key Takeaways
- Learn to create a visually stunning space-themed dessert for any birthday.
- Follow a step-by-step recipe that is suitable for bakers of all skill levels.
- Discover how to achieve a deep space look with swirling colors and star-like accents.
- Use a unique frosting ingredient to add both flavor and essential color.
- Master multiple decorating techniques, from beginner-friendly to advanced.
- Gain the confidence to bake a showstopping treat that will impress your guests.
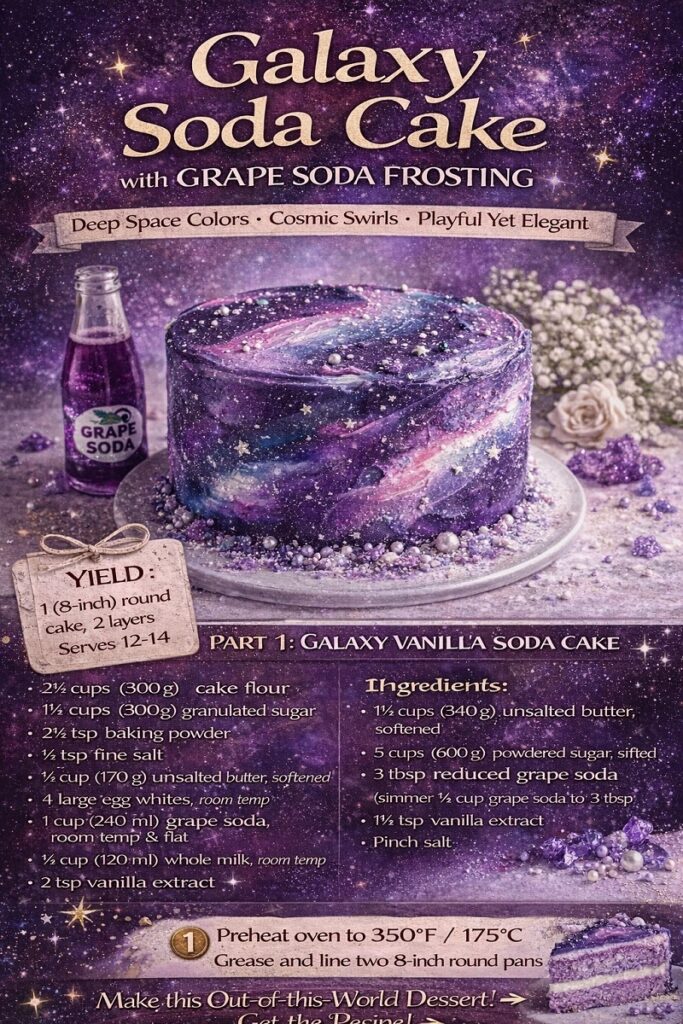
Making Galaxy Soda Cake with Grape Soda Buttercream
Here is the recipe for making a Galaxy Design Soda Cake with Grape Soda Frosting.
This cake is designed so home bakers can realistically achieve nebula swirls, star splatter, and deep-space color gradients.
Even better, no specialty bakery equipment required.
You will enjoy this playful yet elegant dessert for sure.
Yield: Two 8-inch round layers (serves 12–14)
Flavor Profile: Vanilla-forward cake with subtle grape aroma, balanced sweetness
Why soda works: Grape soda adds moisture, lightness, and enhances color vibrancy
GALAXY VANILLA SODA CAKE
Ingredients
- 300 g (2½ cups) cake flour
- 300 g (1½ cups) granulated sugar
- 2½ tsp baking powder
- ½ tsp fine salt
- 170 g (¾ cup) unsalted butter, softened
- 4 large egg whites, room temperature
- 240 ml (1 cup) grape soda, room temperature and flat
- 120 ml (½ cup) whole milk, room temperature
- 2 tsp vanilla extract
- Violet or purple gel food coloring (very small amount)
Preparation
- Preheat oven to 175°C / 350°F
- Grease and line two 8-inch round pans
Method
- Whisk flour, sugar, baking powder, and salt in a large bowl.
- Beat butter into dry ingredients on low speed until mixture resembles fine crumbs.
- Whisk egg whites, milk, grape soda, and vanilla together.
- Add liquids to dry ingredients in two additions, mixing until smooth.
- Tint batter very lightly with purple gel (cake interior should be pale lavender).
- Divide evenly between pans.
Bake
- Bake 22–25 minutes, rotating halfway.
- Cakes are done when tops spring back and a toothpick comes out clean.
- Cool 10 minutes in pans, then cool completely on racks.
GRAPE SODA BUTTERCREAM (GALAXY BASE)
Ingredients
- 340 g (1½ cups) unsalted butter, softened
- 600 g (5 cups) powdered sugar, sifted
- 3 tbsp reduced grape soda (see below)
- 1½ tsp vanilla extract
- Pinch fine salt
Grape Soda Reduction
- Simmer ½ cup grape soda until reduced to 3 tbsp, cool completely.
Method
- Beat butter until pale and fluffy (3 minutes).
- Gradually add powdered sugar on low speed.
- Add grape soda reduction, vanilla, and salt.
- Beat on medium-high 2 minutes until smooth and spreadable.
COLORING THE GALAXY FROSTING
Divide frosting into 4 bowls:
- Deep Space Purple: purple + tiny drop black
- Midnight Blue: blue + small purple
- Nebula Pink: pink + hint purple
- Starlight White: leave plain
Do not fully mix colors smooth. A slight streaking helps to achieve that galaxy effect.
ASSEMBLY
- Level cake layers if needed.
- Place first layer on cake board.
- Spread ¾ cup frosting evenly.
- Add second layer and crumb coat lightly.
- Chill 20 minutes.
GALAXY DESIGN DECORATION TECHNIQUE
1: Cosmic Frosting Application
- Apply random patches of each frosting color around the cake.
- Use an offset spatula to gently blend with long, sweeping motions.
- Do not overblend—visible color clouds create nebula depth.
2: Create Nebula Highlights
- Add small touches of white frosting.
- Blend lightly outward to mimic glowing gas clouds.
3: Twinkling Stars
Star Splatter (Chef Trick):
- Thin 2 tbsp white frosting with ½ tsp milk.
- Dip clean paintbrush or toothbrush.
- Flick gently over cake.
✨ This creates realistic star clusters.
4: Optional Galaxy Accents
- Edible silver stars
- Pearl sprinkles
- Light dusting of edible shimmer
STORAGE & SERVING
- Refrigerate up to 48 hours
- Bring to room temperature 45 minutes before serving
- Best visual impact within 24 hours
CHEF’S NOTES (WHY THIS WORKS)
- Soda keeps crumb moist and forgiving during decorating
- Reduced soda intensifies flavor without thinning frosting
- Multi-tone frosting creates depth without piping skill
- Imperfection = realism in galaxy design
Introduction to Your Intergalactic Cake Adventure
Your adventure into celestial baking begins by undestanding the impact that making and decorating soda cakes can have in your desserts.
These treats go beyond ordinary birthday desserts by capturing the infinite beauty of the cosmos.
They transform your kitchen into a cosmic workshop where edible art comes to life.
What Makes a Galaxy Cake Special
These space-themed creations stand out through their incredible versatility. You can incorporate the celestial theme throughout the entire baking process.
From colorful swirled batter to decorative elements, every layer tells a cosmic story.
The beauty of these recipes lies in their adaptability. Beginners can achieve stunning results with simple techniques.
Advanced bakers can challenge themselves with intricate finishes. Everyone can create something uniquely beautiful.
Inspiration Behind the Design
The design draws from humanity’s endless fascination with the universe. Think about vibrant nebulas, twinkling stars, and mysterious darkness.
These elements translate into harmonious, otherworldly patterns on your dessert.
Bold color combinations create the signature cosmic look. Deep purples, electric blues, and hot pinks blend together.
Each creation becomes a personal vision of the night sky.
Gathering Essential Supplies
Getting organized with the right equipment will set you up for baking triumph.
Having everything measured and ready before you start makes the process smoother and more enjoyable.
Must-Have Kitchen Tools and Equipment
A reliable mixer is essential for creating smooth batter and fluffy buttercream. Stand mixers work great, but handheld versions are also effective.
Decorating tools make all the difference. Offset spatulas help you apply frosting evenly. A cake turntable lets you work around the entire creation smoothly.
Specialized items like silicone cake pop molds create planetary spheres. Food-grade paint brushes add starry splatter effects for that celestial finish.
Mastering the Galaxy Design Cake with Grape Soda Frosting
Success with this intricate baking project hinges on understanding the complete workflow before starting.
This isn’t a simple one-bowl recipe but a multi-step process that combines several components.
You’ll work through distinct stages to create that jaw-dropping final result. Each phase builds upon the previous one for a cohesive celestial look.
| Stage | Description | Approximate Time | Preparation Tips |
|---|---|---|---|
| Batter Preparation | Mixing and coloring your base | 30-45 minutes | Have all colors measured and ready |
| Baking Layers | Creating the foundation | 25-35 minutes | Use even pan sizes for consistency |
| Frosting Creation | Developing space-inspired hues | 20-30 minutes | Work with room temperature ingredients |
| Assembly & Decoration | Bringing all elements together | 45-60 minutes | Work in a cool environment |
Proper planning makes this complex recipe much more manageable. Read through all directions at least twice before beginning.
Gather your ingredients and tools in advance. This preparation prevents mid-process interruptions that can affect your results.
Time management is crucial for success. Many components can be prepared ahead, spreading the workload across multiple days if needed.
Watch tutorial videos multiple times for visual guidance. Seeing techniques in action provides invaluable insight that written instructions alone cannot convey.
With careful preparation and attention to detail, even intermediate bakers can achieve spectacular results.
Your finished creation will have everyone asking how you made something so professional-looking.
Related: Decorating Designs to Transform Simple Soda Cakes

Planning Your Cake: From Batter to Celestial Colors
Before you mix a single ingredient, your color plan sets the stage for success.
Thoughtful preparation ensures vibrant, realistic space effects in your final creation. This planning phase makes the entire process smoother.
Decide on your celestial palette early in the process. Choose between traditional deep-space tones or brighter, fantasy-inspired hues. Your vision guides how you portion and mix colors.
Tips for Effective Color Mixing
Divide your batter into separate bowls for each shade you want. Use gel food coloring for intense, vibrant results without thinning your mixture.
Add color gradually, mixing thoroughly between additions.
Start with just a few drops of gel coloring. Remember that colors often deepen during baking. It’s easier to add more color than to fix an overly dark mix.
Add a small amount of white gel to each portion. This professional trick lightens and brightens your tones. It creates dimension and prevents muddy results.
Portioning Techniques for Unique Planet Effects
Adjust your bowl sizes based on how much of each color you need. You might want larger amounts of dark blues for space backgrounds. Use smaller portions for bright accent colors.
For planet decorations, plan specific color combinations. Mix red and yellow for a fiery sun effect. Combine blue and green with white for an Earth-like appearance.
Teal with white creates an icy Uranus look. Purple with white produces mysterious Neptune tones. These combinations make your celestial bodies look authentic.
Consider making a small test batch with your chosen colors. This lets you adjust ratios before committing to the full recipe. You’ll see how colors develop during baking.
Preparing Your Cake Batter and Mixing Techniques
Your journey to a spectacular space-themed treat begins with perfectly prepared batter.
Following the correct sequence ensures tender layers that support your decorative elements.
Proper mixing creates the ideal foundation for your masterpiece.
| Mixing Technique | Purpose | Recommended Time | Key Result |
|---|---|---|---|
| Creaming Method | Incorporate air into butter and sugar | 1-2 minutes | Light, fluffy texture |
| Alternating Addition | Prevent overmixing and gluten development | Low speed mixing | Tender crumb structure |
| Final Combining | Ensure smooth, homogeneous batter | Just until combined | Perfect baking consistency |
Creating a Perfect Starry Buttercream Base
The texture of your buttercream is the key to a smooth, professional-looking finish. This icing serves as the canvas for your cosmic creation.
A perfectly made batch holds its shape but spreads easily.
Start with room-temperature butter. Cream it using a whisk attachment on medium speed for about two minutes. The mixture should become pale and fluffy.
Gradually add powdered sugar, one cup at a time. Mix on low speed after each addition. This prevents a sugar cloud and ensures a lump-free consistency.
Once the sugar is incorporated, add salt, vanilla, and milk. Continue mixing until everything is smooth. Your vanilla buttercream is now ready for coloring.
Divide the finished frosting into four separate bowls. Add gel food coloring to create your space palette. Common choices are black, blue, white, and pink.
A smart tip is to apply a base coat of white buttercream to your dessert first. This technique saves on darker colors. It also prevents guests from having black-stained teeth.
To create the swirled effect, spoon the colored icings alternately into a piping bag. Do not overmix them inside the bag. You want distinct color sections for a beautiful marbled pattern.
Work quickly once your buttercream is colored. If you need a break, press plastic wrap directly onto the surface of each bowl. This prevents a crust from forming.
Crafting the Mirror Glaze and Stellar Galaxy Effects
Temperature control becomes your most important skill when working with mirror glaze. This glossy finish creates that stunning reflective surface everyone admires.
The process requires precision but delivers incredible results. You’ll transform your creation into a true work of art.
Maintaining the Ideal Glaze Temperature
Your glaze must reach exactly 90°F (32°C) for perfect application. Use a food thermometer to verify this critical temperature.
If the mixture is too hot, it will run off the sides without sticking. If it’s too cold, the glaze becomes sticky and won’t pour smoothly.
| Preparation Stage | Key Action | Time Required | Temperature Goal |
|---|---|---|---|
| Gelatin Blooming | Combine water and gelatin | 10 minutes | Room temperature |
| Sugar Syrup | Boil sugar mixture | 2-3 minutes | Simmering heat |
| Chocolate Melting | Pour over chopped chocolate | 2 minutes standing | Gentle warmth |
| Final Glaze | Blend until smooth | Until combined | 90°F (32°C) |
Begin by blooming gelatin in a small bowl with water for about ten minutes. Meanwhile, prepare your sugar syrup by bringing ingredients to a boil.
Combine the hot syrup with bloomed gelatin and condensed milk. Pour this over chopped white couverture chocolate and let it stand covered.
Use an immersion blender to create a smooth mixture without air bubbles. Strain the glaze and divide it into bowls for coloring.
Create your space effects by gently swirling colors together. Pour from the center outward for beautiful dripping edges.

Layering, Frosting, and Assembling Your Space Cake
The assembly phase transforms your baked layers into a cohesive masterpiece ready for decoration. This process requires patience and the right tools to achieve professional results.
Smoothing Techniques for a Professional Finish
Different methods work best for various skill levels. Choose the approach that matches your comfort with decorating.
| Technique | Best For | Tools Needed | Difficulty Level |
|---|---|---|---|
| Turntable Method | Perfectly smooth surfaces | Offset spatula, turntable | Intermediate |
| Scraper Method | Quick, even coverage | Icing scraper, bench scraper | Beginner |
| Combination Approach | Professional sharp edges | Both spatula and scraper | Advanced |
Start by placing your bottom layer on a cake board. Use your piping bag to apply buttercream onto the top surface. Spread it evenly with your spatula.
Add the second layer and gently press down. Repeat the buttercream application. Place the final layer on top and gently press to secure.
Cover the entire creation with buttercream. Focus on achieving smooth sides and a level top surface. Your spatula is essential for this process.
For the top cake smooth finish, hold your spatula flat across the surface. Rotate the turntable while keeping the tool steady. This levels the buttercream perfectly.
The buttercream sides require vertical pressure with your spatula. Maintain consistent angle as you spin the dessert. This creates evenly smooth sides.
Chill your assembled creation for twenty minutes. This sets the buttercream before adding colors. For mirror glaze applications, freeze for one hour until firm.
Decorating Your Cake with Edible Sparkles and Space Elements
The final decorating stage transforms your cosmic creation from beautiful to breathtaking. This is where you add the magical details that make it look like a real piece of the universe.
You will use simple techniques to create a stunning starry effect. These final touches bring your masterpiece to life.
Incorporating Edible Glitter and Sprinkles
Start by creating a realistic starfield. Dilute white food coloring in a small bowl. Use a food-grade paint brush to splatter it all over your cake.
This technique gives you hundreds of tiny white dots. They look just like distant stars in the night sky.
Next, add edible glitter stars for extra sparkle. Place a few on your finger and gently press them onto the cake. This adds wonderful dimension to your space theme.
Use the same method for silver sprinkles. Dip your finger into the sprinkles to pick up a cluster. Gently press these clusters onto the cake in different spots.
Final Touches for an Out-of-This-World Look
Now, focus on the borders. Use a piping bag with a star tip to pipe stars around the top edge of your cake. This creates a beautiful frame for your galaxy design.
You can also pipe decorative ruffles around the base. This gives your dessert a polished, finished look.
Finally, toss galaxy-themed sprinkles around the sides and in the center. A light dusting of black pearl dust on the top adds a subtle shimmer.
These final steps ensure every angle of your creation is Instagram-worthy. Your stunning space-themed dessert is now complete.
Troubleshooting and Expert Tips for a Stellar Result
Even the most carefully planned baking projects can hit a snag.
Having a troubleshooting guide ensures your cosmic creation turns out perfectly. These expert tips will save you time and frustration.
Watch video tutorials multiple times before you start. Analyze how the glaze is applied and its consistency. This visual guide is invaluable for understanding the entire process.
Plan and prepare in advance.
- Read all directions carefully.
- Make sure you have every ingredient and tool ready.
- Give yourself a generous amount of time to work without rushing.
Temperature control is critical for mirror glaze. Use a food thermometer for peace of mind. The glaze must be exactly 90°F for perfect application.
If your glaze is too thick, it is too cold. Warm it in the microwave for five-second intervals. Stir between each burst until it flows smoothly.
If the glaze runs right off your dessert, it is too hot. Let it cool at room temperature.
Check the temperature frequently until it reaches the ideal point.
| Common Challenge | Likely Cause | Quick Solution |
|---|---|---|
| Muddy batter colors | Too much coloring added at once | Start with a small amount, mix, then add more gradually |
| Black frosting stains | Using only deep black food coloring | Apply a white buttercream base first; consider using black cocoa powder for a chocolate flavor |
| Glaze loses shine | Applied too far in advance | Apply the glossy finish the same day you plan to serve for the best look |
| Difficult cutting | Cold or sticky glaze | Use a very warm knife (dipped in hot water and dried) for clean slices |
Reaching the Final Frontier
You’ve now reached the final frontier of your baking adventure, equipped with skills to create stunning cosmic desserts.
This journey has transformed your kitchen into a celestial workshop.
Remember that each creation reflects your personal vision of the cosmos. Embrace any variations as part of your dessert’s unique character.
Like the universe itself, no two galaxy treats are exactly alike.
The techniques you’ve mastered will serve you well in future baking projects. Your investment of time and effort pays off with every celebration you enhance.
Consider exploring other space-themed recipes to build your cosmic dessert repertoire. The joy of presenting these creations makes every moment worthwhile.
Next: Learn to make a neon-green Grinch cake for Christmas.