Christmas Soda Cakes with Grinch-inspired Decorating Designs
What if your holiday dessert could tell a story of transformation, from grumpy to joyful, just like a beloved Christmas character?
Welcome to a festive baking journey where whimsy meets simplicity. We’re combining the playful spirit of the Grinch with an incredibly easy treat.
The result is a dessert that’s as fun to make as it is to eat.
This guide will show you how to create a stunning centerpiece for your celebrations. You’ll learn a simple recipe that uses vibrant green colors and creative techniques.
Even if you’re new to baking, you can master this project.
It’s the perfect way to bring a touch of Whoville magic into your home.
While it requires a little time and care, the final product is absolutely worth the effort.
Get ready to impress your guests with a creation that captures the heart of the season.
Key Takeaways
- Learn a simple method for creating a festive and visually stunning holiday dessert.
- Discover how to incorporate a classic Christmas character theme into your baking.
- Master easy decorating techniques that are perfect for bakers of all skill levels.
- Understand the ingredient choices that make this recipe both delicious and unique.
- Gain tips for managing your time effectively to create a stress-free baking experience.
- Create a memorable conversation piece that will be the highlight of your Christmas gathering.
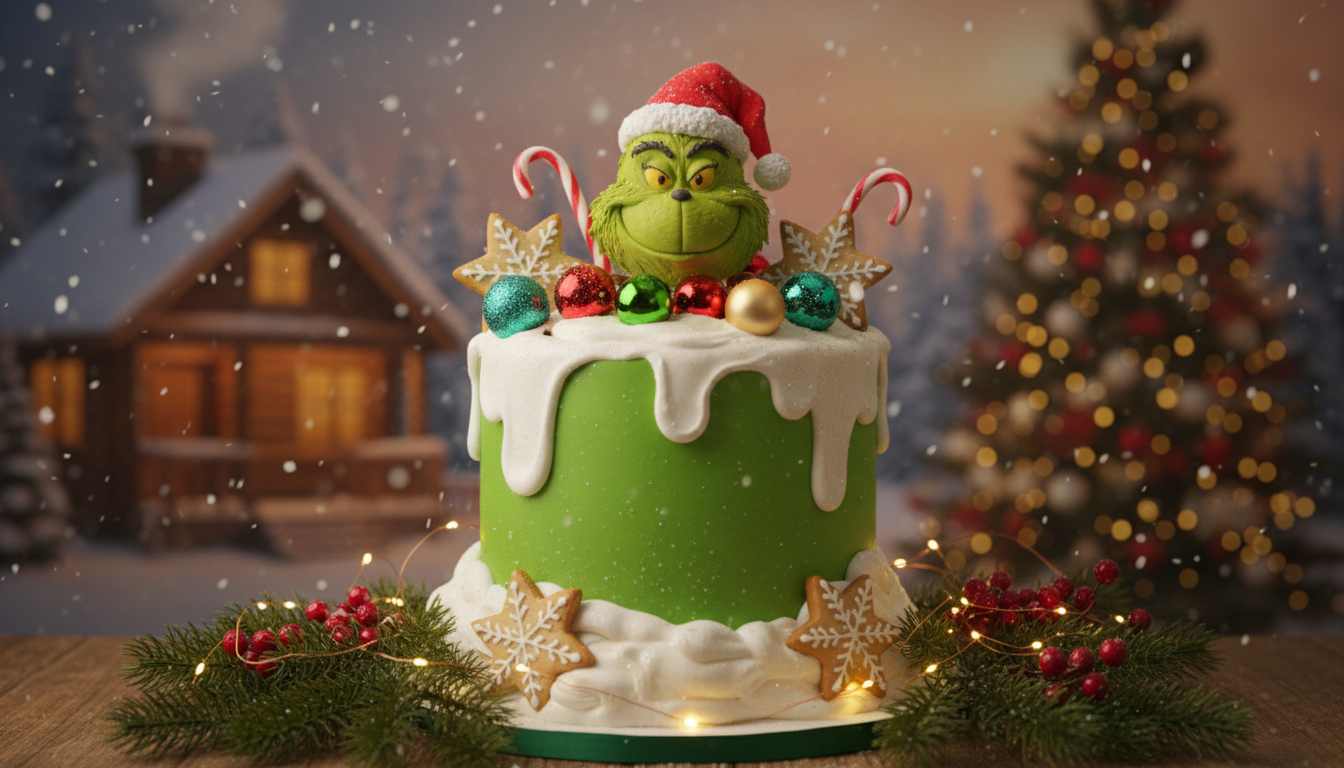
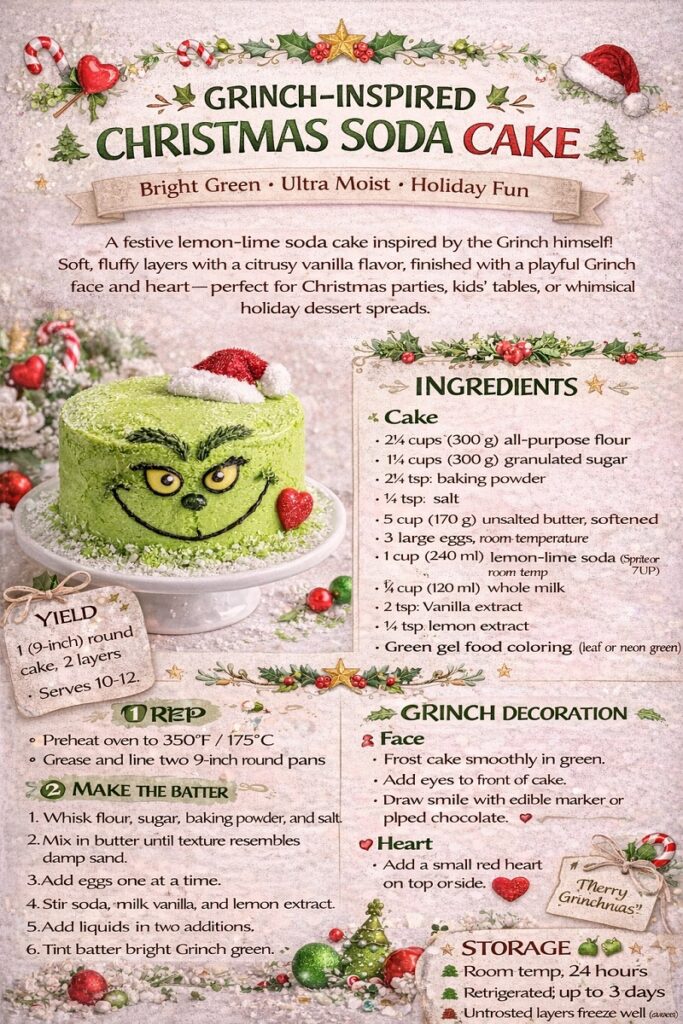
Grinch-Inspired Christmas Soda Cake (Bright Green, Ultra-Moist)
This playful Christmas soda cake is inspired by the Grinch’s signature green color and citrusy attitude.
Made with lemon-lime soda for lift and moisture, it bakes up tender, fluffy, and vibrantly green,
This one is perfect for holiday parties, kids’ tables, or a whimsical dessert centerpiece.
Best baked fresh within 24 hours for peak color and softness.
Cake Yield
- One 9-inch round cake, sliced into 2 layers
- Serves 10–12
Ingredients
Grinch Soda Cake Layers
- 300 g (2½ cups) all-purpose flour
- 300 g (1½ cups) granulated sugar
- 2½ tsp baking powder
- ½ tsp fine salt
- 170 g (¾ cup) unsalted butter, softened
- 3 large eggs, room temperature
- 240 ml (1 cup) lemon-lime soda (Sprite or 7UP), room temperature
- 120 ml (½ cup) whole milk, room temperature
- 2 tsp vanilla extract
- 1½ tsp lemon extract
- Green gel food coloring (leaf or neon green)
Vanilla Buttercream Frosting
- 340 g (1½ cups) unsalted butter, softened
- 600 g (5 cups) powdered sugar, sifted
- 2 tsp vanilla extract
- 2–3 tbsp heavy cream or milk
- Pinch of salt
Grinch Decorations
- Green gel food coloring
- Red sanding sugar or red fondant (for heart)
- Mini candy eyes or white fondant + edible marker
- Black edible marker or melted dark chocolate
- Optional: green coconut flakes or green sprinkles
Instructions
1. Prepare the Cake Pans
- Preheat oven to 175°C / 350°F
- Grease two 9-inch round pans, line bottoms with parchment, and lightly flour.
2. Mix the Cake Batter
- In a large bowl, whisk flour, sugar, baking powder, and salt.
- Add softened butter and mix on low speed until mixture resembles damp sand.
- Add eggs one at a time, mixing just until incorporated.
- In a separate bowl, combine soda, milk, vanilla, and lemon extract.
- Add wet ingredients in two additions, mixing on low speed.
- Add green gel food coloring gradually until a bright Grinch green is achieved.
3. Bake
- Divide batter evenly between pans.
- Bake 25–30 minutes, rotating halfway.
- Cakes are done when:
- Tops spring back lightly
- A toothpick inserted comes out clean
- Cool in pans 10 minutes, then turn out onto racks and cool completely.
Buttercream Frosting
- Beat butter on medium speed for 3 minutes until pale and fluffy.
- Add powdered sugar gradually on low speed.
- Add vanilla, salt, and cream.
- Increase speed and whip 2–3 minutes until smooth and spreadable.
- Tint frosting light green for Grinch skin tone.
Grinch-Themed Decoration Instructions
Frost the Cake
- Stack layers with frosting in between.
- Apply a smooth or lightly textured green finish.
Create the Grinch Face (Front of Cake)
- Lightly sketch the face outline with a toothpick.
- Add:
- Eyes: mini candy eyes or fondant circles
- Smile: black edible marker or piped chocolate
- Pipe darker green frosting around eyes and cheeks for depth.
Add the Grinch Heart ❤️
- On the top or side of the cake:
- Shape a small heart using red fondant
- Or pipe a heart and coat with red sanding sugar
Final Touches
- Optional green sprinkles or coconut around the base
- Light dusting of powdered sugar for a “Who-ville snowfall”
- Optional topper: “Merry Grinchmas”
Storage & Make-Ahead Tips
- Store covered at room temperature for 24 hours
- Refrigerate up to 3 days, bring to room temp before serving
- Freeze unfrosted layers up to 30 days
Kick Off Your Holiday Baking Adventure
The journey of the Grinch, from a holiday grump to a character with a heart full of joy, offers a wonderful theme for your baking.
This project lets you create more than just a dessert. You are crafting an edible story full of holiday spirit.
Discover the Grinch-Inspired Twist
This famous character has appeared in several films. Each version has a unique look. The classic cartoon version is often the best choice for your cake.
Its simple, whimsical features are easier to recreate with frosting. This helps you capture his signature green color and fuzzy texture perfectly.
| Grinch Version | Year | Best For Decorating? | Key Feature |
|---|---|---|---|
| Classic Cartoon | 1966 | Yes | Simple, iconic shapes |
| Live-Action Film | 2000 | No | Detailed, realistic features |
| Animated Film | 2018 | Maybe | Modern, expressive design |
Adding a heart to your design is a powerful touch. It symbolizes his transformation. This adds a deep, meaningful layer to your festive creation.
Embrace the Festive Spirit with Soda Cakes
Using a soda-based recipe for your cake layers is a fantastic idea. It creates a light and moist texture. This pairs beautifully with rich buttercream.
You can also add fun elements like a cookie dough filling. This makes each slice a delightful surprise. It’s a simple way to make your dessert unforgettable.
Essential Tools for a Grinchy Twist
Before you begin mixing and baking, gathering your essential supplies will set you up for decorating success.
Having everything measured and ready makes the process smooth and enjoyable.
Must-Have Baking Equipment and Decor Supplies
Gather your essential baking equipment first. You’ll need multiple cake pans in different sizes. A stand mixer or hand mixer makes blending easier.
Parchment paper, mixing bowls, and spatulas are essential. For decorating, consider specialized tools like acetate sheets. These help create smooth frosting surfaces.
A small fork can create fur texture. Toothpicks work well for tracing designs. Piping bags with various tips complete your toolkit.
| Food Coloring Type | Best For | Color Intensity | Effect on Consistency |
|---|---|---|---|
| Gel Food Coloring | Frosting & Batter | High | Minimal Change |
| Liquid Food Coloring | Icings Only | Medium | Can Thin Mixture |
| Powder Food Coloring | Dry Mixes | Variable | No Liquid Added |
| Natural Food Coloring | Light Colors | Low | May Affect Texture |

Grinch-inspired decorated Soda Cakes: The Ultimate Recipe
The moment has arrived to transform your carefully prepared components into a stunning holiday creation.
This recipe brings together all the elements you’ve gathered for a truly memorable dessert experience.
Step-by-Step Directions for the Cake Layers
Begin by preparing your cake batter according to the mixing techniques outlined earlier. Ensure your oven is preheated to the correct temperature before you start.
Divide the batter evenly between your prepared pans. This ensures uniform baking and consistent layers. Bake for the recommended time, checking for doneness with a toothpick.
Allow the cakes to cool completely before assembling. Proper cooling prevents the frosting from melting and maintains the structure of your creation.
Crafting the Edible Compost Cookie Dough Filling
Start by creaming together room temperature butter and brown sugar in a large bowl. Use your mixer on medium speed until the mixture becomes light and fluffy.
Add the salt, baking powder, instant espresso mixture, and vanilla extract. Mix on low speed until all ingredients are fully incorporated into the butter-sugar base.
Gently pulse in the graham cracker crumbs, mini white chocolate chips, crushed potato chips, chopped pretzels, rainbow sprinkles, and butterscotch chips.
Be careful not to overmix and crush the delicate components.
Finally, mix in the heat-treated flour on low speed, then add the pasteurized egg whites.
This combination makes the cookie dough completely safe to eat raw while maintaining perfect texture.
Creative Decorating Designs and Festive Finishing Touches
The decorating stage is where your holiday dessert truly takes on its personality and becomes a conversation piece.
This is your chance to add the magical details that make your creation stand out.
Mastering these techniques will give you professional-looking results. Even beginners can achieve stunning effects with the right approach.
Frosting Techniques for a Smooth and Fuzzy Look
Start with a thin crumb coat around your stacked layers. This seals in crumbs and creates a smooth foundation.
Use an acetate sheet to smooth the sides while rotating your turntable. Chill the cake until the frosting feels firm before adding your final green layer.
Create fuzzy texture by dipping a fork in hot water. Gently run it over the frosting for that signature fur effect.
Using Gel Food Coloring for Vibrant, Grinchy Shades
Gel food coloring gives you intense color without thinning your frosting. It’s perfect for achieving that bright green shade.
Add the coloring gradually to control the intensity. Mix thoroughly for an even distribution throughout your frosting.
Adding Fun Details like the Grinch Face and Heart
Trace the face outline with a toothpick before piping. This gives you a guide to follow for perfect proportions.
Related: Stenciling for a minimalist cake decor.
Use a small piping bag with a round tip for black details. Anchor your arm against the counter for steady lines.
Consider adding a red heart detail on the side. It symbolizes the character’s transformation and adds meaning.

Customizing Your Cake for a Memorable Christmas Celebration
Your festive creation becomes truly special when you add personal touches that reflect your unique style.
This is your chance to make the dessert truly yours while keeping the holiday spirit alive.
Consider adding a hidden heart inside your green cake. This surprise element represents the character’s transformation beautifully.
Bake a separate red cake layer for this special feature.
Personalize with Unique Flavor Twists and Textures
Move beyond basic vanilla by experimenting with different flavors. Pistachio extract adds a nutty taste that complements the green color perfectly.
Banana flavor offers a fun nod to the movie’s famous line.
Try alternative fillings if you want variety. Cream cheese frosting or peppermint buttercream create Christmas-forward flavors. Chocolate ganache provides a rich, decadent option.
| Flavor Variation | Ingredients Needed | Best Paired With | Difficulty Level |
|---|---|---|---|
| Pistachio Twist | Pistachio extract, ground pistachios | Vanilla buttercream | Easy |
| Banana Celebration | Banana extract, mashed banana | Cream cheese frosting | Medium |
| Peppermint Joy | Peppermint extract, crushed candy canes | Chocolate ganache | Easy |
| Chocolate Delight | Cocoa powder, chocolate chips | Vanilla or mint frosting | Easy |
Innovative Presentation and Garnishing Ideas
Make individual servings for large gatherings. Use smaller cake pans or create cupcakes instead. Adjust your baking time to about 20 minutes for cupcake versions.
Plan ahead by freezing cake layers for several weeks. Frozen layers are firmer and easier to stack. This saves valuable time during busy holiday preparations.
Let your finished cake come to room temperature before serving. This ensures the best texture and flavor experience for your guests.
Desserts that Capture the Magic of the Season
The final result of your efforts is more than just a dessert. It’s a celebration of holiday spirit. You’ve created something that captures the magic of the season through your baking skills.
This Grinch-inspired project has taught you valuable techniques that extend beyond this single recipe.
The smooth frosting work and creative piping will serve you well in future cake adventures.
Remember that every minute spent on this food project was worth it. The joy on your guests’ faces makes the effort truly rewarding.
Your creation tells a story of transformation and holiday cheer.
Take pride in what you’ve accomplished and continue exploring new baking ideas. Each project builds your confidence and creativity in the kitchen.
Want another festive holiday treat? Then check out our mini bundt cakes with eggnog soda glaze recipe.